actfw: How to use
We’ll introduce actfw and show how to use it.
Libraries
actfw provides the two following libraries:
actfw-core: Actcast application core libraryactfw-raspberrypi: Library specific to Raspberry Pi applications
Installation of actfw
You can install actfw-* via pip. actdk init generates dependencies.json that installs actfw-raspberrypi by default.
Computation model of actfw
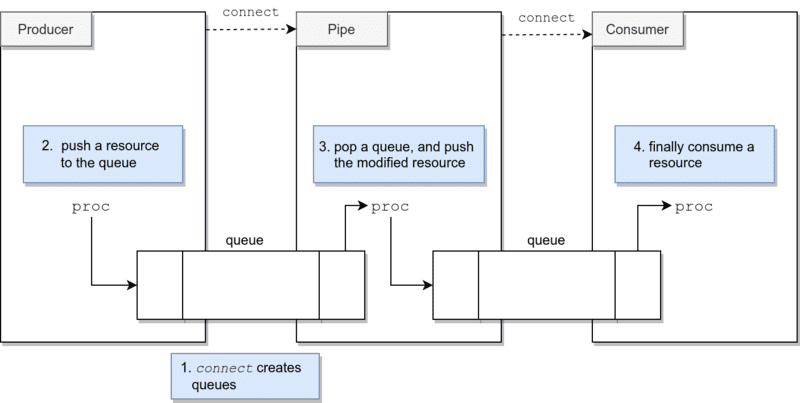
actfw is a framework provided by Idein that models async computations.
In this model, the user defines the flow of data by using the connect method to link a task’s output to the next one’s input.
The class Application is the entry point of the application.
app = actfw_core.Application()
app.run()
Asynchronous tasks are classified into the three following categories:
Producer: produces resources continuouslyPipe: modifies resources and passes them to the next tasks continuouslyConsumer: finally consumes resources continuously
For example, the following three tasks:
- Take a photo from a camera (
Producer)- A task getting RGB pictures continuously
- Convert an image to grayscale (
Pipe)- A task converting an RGB picture to grayscale continuously
- Display (
Consumer)
can be described as follows:
import actfw_core
from actfw_core.task import Pipe, Consumer
from actfw_core.capture import V4LCameraCapture
import actfw_raspberrypi
from actfw_raspberrypi.vc4 import Display

class Converter(Pipe):
  ...

class Presenter(Consumer):
  ...

app = actfw_core.Application()

# Capture task
cap = V4LCameraCapture('/dev/video0', (CAPTURE_WIDTH, CAPTURE_HEIGHT), CAPTURE_FRAMERATE, format_selector=V4LCameraCapture.FormatSelector.PROPER)
app.register_task(cap)

# Converter task
conv = Converter()
app.register_task(conv)

# Presentation task
pres = Presenter(settings, camera, cmd)
app.register_task(pres)

# Make task connection
cap.connect(conv)  # from `cap` to `conv`
conv.connect(pres) # from `conv` to `pres`

app.run()
This example is a simplified version of the grayscale example in Getting Started.
Camera configuration
The camera types compatible with a Raspberry Pi are the following two kinds:
- Official Raspberry Pi Camera Module
- Generic USB Camera
Note that each one of them has a different interface.
actfw_raspberrypi.capture.PiCameraCapture supports the former camera,
actfw_core.capture.V4LCameraCapture supports both cameras.
We use the latter in this tutorial.
In actfw, V4LCameraCapture is used as a Producer that takes pictures from a camera, like the following snippet:
app = actfw_core.Application()

# Capture task
cap = V4LCameraCapture('/dev/video0', (CAPTURE_WIDTH, CAPTURE_HEIGHT), CAPTURE_FRAMERATE, format_selector=V4LCameraCapture.FormatSelector.PROPER)
app.register_task(cap)
Communication with the Actcast device agent
The Actcast device agent sends requests to the application using a UNIX Domain Socket. The agent passes the socket’s path to the application via the environment variable ACTCAST_COMMAND_SOCK. The application is expected to create a UNIX Domain Socket to the path specified in ACTCAST_COMMAND_SOCK and wait for requests. The agent connects to the socket and sends requests that the application needs to process and reply to.
While the processes in main are implemented at the developer’s discretion, we strongly recommend handling the following requests:
- External command requests
- Currently TakePhoto command only
For applications using cameras, we recommend implementing the TakePhoto command; so that users can check the position of their device.
In actfw, you can use the CommandServer class for handling the requests. A CommandServer instance holds an image internally and returns it when it receives a “send-image” request. Therefore you have to update the stored image by invoking its update_image method.
class Presenter(Consumer):
    def __init__(self, ..., cmd):
      self.cmd = cmd

    def proc(self, ...):
      ...
      self.cmd.update_image(rgb_image) # update `Take Photo` image
      ...

# Actcast application
app = actfw_core.Application()

# CommandServer (for `Take Photo` command)
cmd = actfw_core.CommandServer()
app.register_task(cmd)

# Presentation task
pres = Presenter(..., cmd)
app.register_task(pres)
Alive monitoring of applications
If an application seems unhealthy, for example, if it continuously fails to process images, the Actcast device agent restarts the application. healthchecker performs the health check.
Here we show an example of healthchecker; this script checks if an update of the timestamp of /root/heartbeat occurred within the last minute.
#!/bin/bash

HEARTBEAT_FILE='/root/heartbeat'

[ "$(find "${HEARTBEAT_FILE}" -mmin -1)" == "${HEARTBEAT_FILE}" ]
To make healthchecker work, main has to update the timestamp of /root/heartbeat at regular intervals by calling actfw_core.heartbeat().
class Presenter(Consumer):
  def __init__(self):
    ...

  def proc(self, image):
    # update image here
    actfw_core.heartbeat()
If the previous task hangs, the timestamp update does not occur, and therefore, healthchecker detects the unhealthiness.
Display
In general, most Actcast applications are designed for advanced sensing; thus, implementing display is often unnecessary. In some cases, however, it is useful to display computation results, e.g., for demos or checking the functioning. In actfw-raspberrypi, the Display object helps display RGB images on screens connected via HDMI.
In the following example, the Presenter class displays an RGB image to a screen. The Presenter class extends the Consumer class; it consumes resources as an ending task. Therefore, its proc method does not return any value.
In this example, we handle an HDMI display as a 640x480 region; we scale and draw 320x240 RGB images to (0, 0, 640, 480).
class Presenter(Consumer):
  def __init__(self, camera):
    self.display = Display(camera, (640, 480))

  def proc(self, image):
    self.display.update((0, 0, 640, 480), image.tobytes(), (320, 240), 'rgb')