ActcastOS 3 Migration ガイド
Actcast OS 3 ではベース OS が Raspberry Pi Bullseye となっており、そのためアプリの設定ファイルやコードに修正が必要になります。 ここでは ImageNet Classification を例に、ActcastOS 2 上で動作する既存のアプリを ActcastOS 3 に対応する方法について説明します。
コード全体は こちら を参照してください。
事前準備
既に Actcast 上で保守しているアプリがあることを前提としています。
アプリを作り直すことなく、既存のアプリを Bullseye にも対応するための修正を行います。
Actdk コマンド
ActDK が 1.26.3 以上であることを確認してください。
$ actdk --version

actdk 1.26.3
Actsim
Bullseye 版の Actsim イメージ ( actsim-raspberrypi-bullseye.img ) をダウンロードして SD カードに書き込んでください。
ベンダコンソールの SDK ページからダウンロードすることが可能です。
Buster 版の Actsim イメージ ( actsim-raspberrypi.img ) とは別の SD カードを利用すると、イメージの焼き直しを行わずに切り替えることができます。
Bullseye 版であることが分かりやすいように、 actdk remote add コマンドを実行する時に Bullseye であると判別しやすい名前を付けておくと便利です。詳細は ActDK コマンドリファレンス を参照してください。
今回の例では example.local でアクセスできる Actsim に bullseye-actsim という名前を付けています。
$ actdk remote add bullseye-actsim@example.local事前準備の確認
Bullseye 版の Actsim に対して actdk build コマンドを実行し、以下のエラーが出ることを確認してください。
異なるエラーが出ている場合、Actdk コマンドのバージョンが 1.24.0 以上であることと、 Actsim が Bullseye であることを確認してください。
$ actdk build bullseye-actsim

Error:
   0: Target type for remote `Raspberry Pi (bullseye)` is not set.

Location:
   src/workspace.rs:633

Suggestion: Try to add "raspberrypi-bullseye" to "target_types" in your .actdk/setting.json
修正箇所の概要
まずはじめに修正の必要な項目について列挙します。
.actdk/setting.jsonにtarget_typesを明示し、raspberrypi-bullseyeを含める。.actdk/dependencies.jsonファイルに 1 で追加したraspberrypi-bullseyeのセクションを含める。manifesto/に Bullseye 用のマニフェストファイルを追加する。- カメラデバイスとして Raspberry Pi 公式の CSI カメラを使う場合と USB カメラを使う場合とで、 API を使い分ける修正を行う。
以下ではそれぞれの修正方法を具体的に説明します。
.actdk/setting.json の修正
Actcast はファームウェアタイプとして raspberrypi-buster(あるいは raspberrypi) に加えて raspberrypi-bullseye をサポートします。
今後はアプリがどのファームウェアタイプが対象なのかを明示する必要があります。
以下のように target_types をリストで指定してください。
  {
    "app_id": "imagenet-classification-for-raspi",
    "app_server_id": 1,
    "short_description": "1000 class ImageNet classification demo for raspi",
    "short_descriptions": {
      "ja": "ImageNet1000クラス分類デモ(for raspi)"
-    }
+    },
+   "target_types": ["raspberrypi-buster", "raspberrypi-bullseye"]
  }
.actdk/dependencies.json の修正
.actdk/setting.json に追加したファームウェアタイプごとのセクションを追加していきます。
既存の設定で raspberrypi という名称を使用している場合は .actdk/setting.json に合わせて raspberrypi-buster に変更してください。
raspberrypi は将来的に廃止になる可能性があります。
これに加えて raspberrypi-bullseye セクションを追加します。
必要に応じて apt パッケージや pip の依存パッケージを追記してください。
また actfw-raspberrypi のバージョンを 3.2.0 以上にする必要があります。
  {
    "apt": [
      "libv4l-0",
      "libv4lconvert0",
      "python3-pil",
      "python3-numpy",
      "fonts-dejavu-core"
    ],
    "pip": [],
-   "raspberrypi": {
+   "raspberrypi-buster": {
      "apt": [
        "libraspberrypi0"
      ],
      "pip": [
-       "actfw-raspberrypi == 3.0.0"
+       "actfw-raspberrypi == 3.2.0"
      ]
-   }
+   },
+   "raspberrypi-bullseye": {
+     "apt": [],
+     "pip": [
+       "actfw-raspberrypi == 3.2.0"
+     ]
+   }
  }
注意:bullseye への移行に伴いこれまでインストール出来ていたパッケージがインストール出来ない場合があります。
pip による依存パッケージのインストールでは細かくバージョンを指定しなければならない場合が多いです。apt を用いて依存パッケージのインストールが可能な場合は apt を用いることを推奨します。
以下は pip でインストールしていた opencv を apt でインストールする例です。
{
  ...
  "apt": [
+   "python-opencv"
  ],
  "pip": [
+   "actfw-raspberrypi == 3.2.0"
-   "actfw-raspberrypi == 3.2.0",
-   "opencv-python == 4.5.1.48"
  ]
}
pip でも apt でもインストール出来ないパッケージを利用したい場合は、カスタムイメージ機能をご利用ください。
manifesto ファイルの修正および追加
Bullseye で動作させるアプリを実装するためには Manifesto V2 を使用する必要があります。
既存のマニフェストファイルを修正し、 version を 2 に設定してください。
また、target_type には raspberrypi-buster と明記します。
  {
+   "version": 2,
+   "target_type": "raspberrypi-buster",
    "boards": [
      "RSPi3B",
      "RSPi3BPlus",
      "RSPi3APlus",
      "RSPi4B"
    ],
    "devices": [
      { "type": "camera" },
      { "type": "videocore" },
      {
        "type": "framebuffer",
        "device": [
          "/dev/fb0"
        ],
        "required": false
      }
    ]
  }
つづいて新規に manifesto/bullseye.json ファイルを追加してください。
manifesto ディレクトリの下であればファイル名は不問です。
ただし、 target_type が重複しないように注意してください。
raspberrypi-buster と raspberrypi-bullseye では一部デバイスタイプで利用されるデバイスファイルが異なります。
以下の camera や videocore のようにデバイスファイルの指定を省略すると、デバイスタイプ毎に通常使用されるデバイスファイルが自動でマウントされるようになります。
ただしデバイスファイルの指定を省略できないデバイスタイプもあるので注意してください。
警告
bullseye では /dev/dri/card0 を直接指定しないでください。
type: videocore を指定することで自動でマウントされます。
詳細は アプリケーションの各種スキーマ を参照してください。
+ {
+   "version": 2,
+   "target_type": "raspberrypi-bullseye",
+   "boards": [
+     "RSPi3B",
+     "RSPi3BPlus",
+     "RSPi3APlus",
+     "RSPi4B"
+   ],
+   "devices": [
+     { "type": "camera" },
+     { "type": "videocore" },
+     {
+       "type": "framebuffer",
+       "device": [
+         "/dev/fb0"
+       ],
+       "required": false
+     }
+   ]
+ }
プログラムの修正
ここからはプログラムの修正を行います。 変更のポイントは以下の 3 点です。
- カメラデバイスを検出するには、 CSI カメラの場合は
actfw_core.systemモジュールのfind_csi_camera_deviceを利用し、 USB カメラデバイスの場合は同モジュールのfind_usb_camera_deviceを利用する。 - Raspberry Pi Bullseye で CSI カメラを使うには
actfw_core.unicam_isp_captureモジュールのUnicamIspCaptureを利用し、それ以外の Raspberry Pi Buster や Bullseye でも USB カメラを使う場合にはactfw_core.captureモジュールのV4LCameraCaptureを利用する。 actfw_raspberrypi.vc4モジュールのopen_window関数の引数に渡すレイヤーは 16 以下の正数で指定する。
この章の例では CSI カメラと USB カメラ両方に対応したアプリを Bullseye 版でも動作するような修正を行なっています。
CSI カメラ・USB カメラのどちら一方のみ対応のアプリを修正する場合は以下の表に従って UnicamIspCaptureとV4LCameraCaptureを使い分けてください。
| OS | CSI カメラを使う場合 | USB カメラを使う場合 |
|---|---|---|
| Buster | V4LCameraCapture |
V4LCameraCapture |
| Bullseye | UnicamIspCapture |
V4LCameraCapture |
ImageNet Classification の場合 USB カメラと CSI カメラに両対応するため、 USB カメラを使う場合に true に設定する use_usb_camera という設定値を追加しました。
setting_schema.json
{
    "$schema": "http://json-schema.org/draft-07/schema#",
    "type": "object",
    "properties": {
        "display": {
            "title": "display",
            "description": "output video to HDMI display",
            "type": "boolean",
            "default": false
        },
        "threshold": {
            "title": "probability threshold",
            "description": "notify when over this threshold",
            "type": "number",
            "default": 0.9,
            "minimum": 0,
            "maximum": 1
-       }
+       },
+       "use_usb_camera": {
+           "title": "use USB camera",
+           "description": "use USB camera instead of Raspberry Pi Camera",
+           "type": "boolean",
+           "default": false
+       }
    },
    "required": [
        "display",
        "threshold"
    ],
    "propertyOrder": [
        "display",
-       "threshold"
+       "threshold",
+       "use_usb_camera"
    ]
}
act_settings.json
  {
    "display": true,
-   "threshold": 0.1
+   "threshold": 0.1,
+   "use_usb_camera": false
  }
なお、アプリが動作している OS が Buster か Bullseye かは get_actcast_firmware_type 関数を使って判定することができます。
if get_actcast_firmware_type() == "raspberrypi-bullseye":
    # Bullseye
else:
    # Buster
最後に前述の 1~3 の変更点を app/main に加えたときの差分になります。
  #!/usr/bin/env python3
  import argparse
  from PIL import Image, ImageDraw, ImageFont
  import actfw_core
  from actfw_core.task import Pipe, Consumer
+ from actfw_core.system import get_actcast_firmware_type, find_csi_camera_device, find_usb_camera_device
  from actfw_core.capture import V4LCameraCapture
+ from actfw_core.unicam_isp_capture import UnicamIspCapture
  import actfw_raspberrypi
  from actfw_raspberrypi.vc4 import Display
  import numpy as np
  from model import Model

  (CAPTURE_WIDTH, CAPTURE_HEIGHT) = (224, 224)  # capture image size
  (DISPLAY_WIDTH, DISPLAY_HEIGHT) = (640, 480)  # display area size


  class Classifier(Pipe):

      def __init__(self, capture_size):
          super(Classifier, self).__init__()
          self.model = Model()
          self.capture_size = capture_size

      def proc(self, frame):
          rgb_image = Image.frombuffer('RGB', self.capture_size, frame.getvalue(), 'raw', 'RGB')
          rgb_image = rgb_image.resize((CAPTURE_WIDTH, CAPTURE_HEIGHT))
          input_image = np.asarray(rgb_image).reshape(1, CAPTURE_WIDTH, CAPTURE_HEIGHT, 3).astype(np.float32)
          probs, = self.model.MobileNet_v2(input_image)
          return (rgb_image, probs[0][1:])


  class Presenter(Consumer):

      def __init__(self, settings, preview_window, cmd):
          super(Presenter, self).__init__()
          self.settings = settings
          self.preview_window = preview_window
          self.cmd = cmd
          self.font = ImageFont.truetype(font='/usr/share/fonts/truetype/dejavu/DejaVuSansMono-Bold.ttf', size=18)
          with open('labels.txt') as f:
              self.labels = f.read().splitlines()

      def proc(self, images):
          rgb_image, probs = images
          top1 = probs.argsort()[-1]
          if probs[top1] > self.settings['threshold']:
              actfw_core.notify([{'prob': float(probs[top1]), 'label': self.labels[top1]}])
          self.cmd.update_image(rgb_image)  # update `Take Photo` image
          actfw_core.heartbeat()
          if self.preview_window is not None:
              draw = ImageDraw.Draw(rgb_image)
              draw.text((0, 0), "{:>6.2f}% {}".format(100 * probs[top1], self.labels[top1]), font=self.font, fill=(0, 255, 0))
              self.preview_window.blit(rgb_image.tobytes())
              self.preview_window.update()

+ def setup_camera_capture(use_usb_camera):
+     framerate = 15
+     device = find_usb_camera_device() if use_usb_camera else find_csi_camera_device()
+
+     if get_actcast_firmware_type() == "raspberrypi-bullseye" and not use_usb_camera:
+         # Use UnicamIspCapture on Raspberry Pi OS Bullseye
+         cap = UnicamIspCapture(unicam=device, size=(CAPTURE_WIDTH, CAPTURE_HEIGHT), framerate=framerate)
+     else:
+         # Use V4LCameraCapture on Raspberry Pi OS Buster or use USB camera
+         cap = V4LCameraCapture(device, (CAPTURE_WIDTH, CAPTURE_HEIGHT), framerate, format_selector=V4LCameraCapture.FormatSelector.PROPER)
+
+     return cap

  def main(args):

      # Actcast application
      app = actfw_core.Application()

      # Load act setting
-     settings = app.get_settings({'display': True, 'threshold': 0.1})
+     settings = app.get_settings({'display': True, 'threshold': 0.1, 'use_usb_camera': False})

      # CommandServer (for `Take Photo` command)
      cmd = actfw_core.CommandServer()
      app.register_task(cmd)

-     # Capture task
-     cap = V4LCameraCapture('/dev/video0', (CAPTURE_WIDTH, CAPTURE_HEIGHT), 15, format_selector=V4LCameraCapture.FormatSelector.PROPER)
+     cap = setup_camera_capture(settings['use_usb_camera'])
      capture_size = cap.capture_size()
      app.register_task(cap)

      # Classifier task
      conv = Classifier(capture_size)
      app.register_task(conv)

      def run(preview_window=None):

          # Presentation task
          pres = Presenter(settings, preview_window, cmd)
          app.register_task(pres)

          # Make task connection
          cap.connect(conv)  # from `cap` to `conv`
          conv.connect(pres)  # from `conv` to `pres`

          # Start application
          app.run()

      if settings['display']:
          with Display() as display:
              display_width, display_height = display.size()
              scale = min(float(display_width / CAPTURE_WIDTH), float(display_height / CAPTURE_WIDTH))
              width = int(scale * CAPTURE_WIDTH)
              height = int(scale * CAPTURE_HEIGHT)
              left = (display_width - width) // 2
              upper = (display_height - height) // 2
-             with display.open_window((left, upper, width, height), (CAPTURE_WIDTH, CAPTURE_HEIGHT), 1000) as preview_window:
+             # layer must be between 1 and 16
+             layer = 16
+             with display.open_window((left, upper, width, height), (CAPTURE_WIDTH, CAPTURE_HEIGHT), layer) as preview_window:
                  run(preview_window)
      else:
          run()


  if __name__ == '__main__':
      parser = argparse.ArgumentParser(description='example: 1000 class classification')
      main(parser.parse_args())
動作確認
通常のアプリ開発と同様に actdk build や actdk run でアプリのビルド、実行を行うことができます。
Buster 版の Actsim と Bullseye 版の Actsim の両方で動作することを確認してください。
アプリのアップロード
通常のアプリ開発と同様に actdk upload でアプリのアップロードを行うことができます。
$ actdk upload
start uploading
Build Submission ID: XX
Build ID for Raspberry Pi: XXXXXXXX-XXXX-XXXX-XXXX-XXXXXXXXXXXX
アップロードは1度行えば Buster と Bullseye それぞれのアプリイメージが Actcast へアップロードされます。
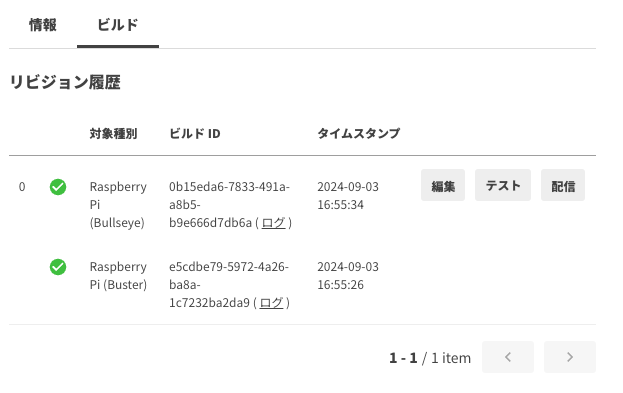
Actcast コンソールでアプリのビルド情報を確認すると1つのリビジョンで Buster と Bullseye それぞれのビルドがアップロードされていることが確認できます。
その他の注意点
その他以下の点にも注意してください。
actfw_raspberrypi.vc4.Displayクラスのopen_windowメソッドの引数に渡すレイヤーはアプリケーション内でユニークになるようにしてください。
  with Display() as display:
      actual_display_size = display.size()
      width, height = actual_display_size
      virtual_display_size = (DISPLAY_WIDTH, DISPLAY_HEIGHT)
-     with display.open_window((0, 0, width, height), (32, 1), 1000) as background:
+     with display.open_window((0, 0, width, height), (32, 1), 1) as background:
          preview_area = window_position(
              actual_display_size, virtual_display_size, (0, 0, UPDATE_AREA_WIDTH, UPDATE_AREA_HEIGHT))
-         with display.open_window(preview_area, (UPDATE_AREA_WIDTH, UPDATE_AREA_HEIGHT), 2000) as preview_window:
+         with display.open_window(preview_area, (UPDATE_AREA_WIDTH, UPDATE_AREA_HEIGHT), 2) as preview_window:
              run(preview_window)
- CSI カメラで
V4LCameraCaptureのset_exposure_timeを使って露光調整していた場合、UnicamIspCaptureに変更してもアプリケーションは動作しますが、露光調整は行われません。露光調整が必要な場合はactfw-core==2.7.0で追加されたset_exposure_settingsを利用してください。