MobileNet Example
This tutorial is intended for ActcastOS 3 or later versions.
ActcastOS 1 and ActcastOS 2 will no longer be supported at the end of 2024.
To measure performance of the application, install the application from Actcast after
actdk upload.ActDK does not accelerate deep learning models in applications.
This document describes the development cycle of an Actcast application. We’ll develop an application that leverages a pre-trained model of 1000-class classification using MobileNet. For simplicity, we present an implementation that supports only CSI cameras. If you want to support USB cameras, please refer to [here](. /ForActcastOS3/#Modifying the program).
Target application
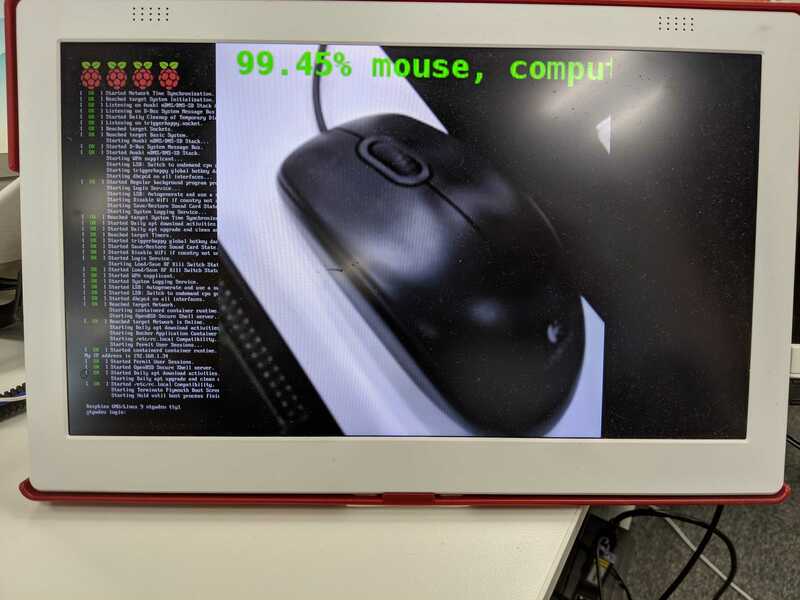
In this tutorial, we will create an application that does image classification through provided ImageNet 1000-class model and notify via Actcast whenever it detects an object with a confidence higher than 90%. The image is captured with the official Raspberry Pi camera module, classified, and then rendered on the screen.
Configurable items
Though it is sufficient in an edge computing scope for the result of the classification task to be notified via a network, displaying the result on a screen is useful for testing or demonstration purposes. Therefore, we add a configuration to enable or disable displaying on the screen.
Also, the required model confidence may vary according to the user’s scope, so we set the detection threshold configurable.
display: whether the display is enabled/disabledthreshold: confidence (probability) threshold for event detection
You can review the classification results with the provided developer kit.
Overview of an Actcast application
An Actcast application is an common Linux application, but some OS features, e.g., network, are restricted. Also, the application is requested to have the following feature implementations for alive monitoring and installation.
- Heartbeat feature
- TakePhoto feature
For flexible operation, applications have configurable parameters. Users may want to set configs like “display is enabled”, “detect only cats”, and “the threshold is 90%”, for this application. You can develop configurable Actcast applications.
Developers have to define application schemas.
Application Structure
Actcast applications must have the following two files in app directory.
mainhealthchecker
main is a program run as the application entry point and can be any executable file. In this document, we will implement the main program in Python.
healthchecker is a script that checks whether the application is working correctly. It uses the HEALTHCHECK instruction of Docker.
After creating these two files, a directory structure will be like this.
application-root
└── app
   ├── main
   └── healthchecker
Create a project
Create an application on Actcast, and set up a project with Actcast SDK as the following:
$ actdk init -i $APP_ID -s "A 1000-class object classfier" object_classifierobject_classifier- Arbitrary name of the application.
-ioption- The application ID issued on the Actcast Web UI. Replace
$APP_IDwith your issued application ID (for example,48).
- The application ID issued on the Actcast Web UI. Replace
-soption- An optional one-line description of the application.
Generate a shared library
We will use the model in the ImageNet Classification app published in the actcast-app-examples repository.
Place the model.nnoir file in the model directory and generate a shared library by actdk compile.
$ wget -O model/model.nnoir https://github.com/Idein/actcast-app-examples/raw/master/imagenet-classification-for-raspi/model/model.nnoir
$ actdk compile
release: Pulling from idein/nnoir2stubc
...(snipped)...
compile finished
This generates the following files:
$ find . -name "*model.*"
./model/model.nnoir
./app/libmodel.so
./app/model.py
./include/model.h
libmodel.so is a shared library including a deep learning model implementation converted from the nnoir file format. model.h and model.py are generated as interfaces to this library. One can also develop applications in C using model.h, however, we use Python with model.py in this document. See Compiler behavior for more details such as limitations of libmodel.so.
model.py
model.py provides an interface to libmodel.so. In this tutorial, MobileNet_v2 is an entry point for model inference. The input and output are numpy arrays, and their shape is the same as the original model.
In this case, the input input0 is a numpy array, and its shape is (1, 224, 224, 3). The output shape is (1, 1001).
from ctypes import cdll
import numpy as np


class Model:

    def __init__(self, sopath='/root/libmodel.so'):
        lib = cdll.LoadLibrary(sopath)

        self.run_MobileNet_v2 = lib.MobileNet_v2_with_zerocopy
        self.run_MobileNet_v2.argtypes = [
            np.ctypeslib.ndpointer(dtype=np.float32, shape=(1, 224, 224, 3, ), flags="C_CONTIGUOUS"),
            np.ctypeslib.ndpointer(dtype=np.float32, shape=(1, 1001, ), flags="C_CONTIGUOUS"),
        ]

    def MobileNet_v2(self, input0):
        output0 = np.empty((1, 1001, ), dtype=np.float32)
        self.run_MobileNet_v2(input0, output0)
        return output0,
Application configuration
This time, .actdk/setting.json, setting_schema.json and data_schema.json should be written as follows respectively.
Manifesto also deletes pi4_or_later.json and modifies default.json slightly.
.actdk/setting.json
Make sure target_types contains raspberrypi-bullseye.
{
  "app_id": "object_classifier",
  "app_server_id": 48,
  "short_description": "A 1000-class object classfier",
  "short_descriptions": {},
  "target_types": [
    "raspberrypi-bullseye"
  ]
}
setting_schema.json
{
    "$schema": "http://json-schema.org/draft-07/schema#",
    "type": "object",
    "properties": {
        "display": {
            "title": "display",
            "description": "output video to HDMI display",
            "type": "boolean",
            "default": false
        },
        "threshold": {
            "title": "probability threshold",
            "description": "notify when over this threshold",
            "type": "number",
            "default": 0.9,
            "minimum": 0,
            "maximum": 1
        }
    },
    "required": [
        "display",
        "threshold"
    ],
    "propertyOrder": [
        "display",
        "threshold"
    ]
}
data_schema.json
{
  "$schema": "http://json-schema.org/draft-07/schema#",
  "type": "array",
  "items": {
    "type": "object",
    "properties": {
      "prob": {
        "title": "probability",
        "description": "matching score",
        "type": "number",
        "minimum": 0.0,
        "maximum": 1.0
      },
      "label": {
        "title": "label",
        "description": "the most matching class name",
        "type": "string"
      }
    },
    "required": ["prob", "label"]
  },
  "propertyOrder": []
}
manifesto/default.json
{
  "version": 2,
  "target_type": "raspberrypi-bullseye",
  "boards": [
    "RSPi3B",
    "RSPi3BPlus",
    "RSPi4B",
    "RSPi2B",
    "RSPi3APlus",
    "RSPiCM3",
    "RSPiCM3Plus",
    "RSPiCM4",
  ],
  "devices": [
    {
      "type": "camera"
    },
    {
      "type": "videocore"
    },
    {
      "type": "display"
    }
  ]
}
The main file
We write the application code using the generated shared library. The structure of the application is as below.
  graph LR;
D[CommandServer]
A[UnicamIspCapture] --> B[Classifier]
B --> C[Presenter]

    subgraph X[" "]
      A
      COMMENT1["Pass an image"]
      style COMMENT1 fill-opacity:0, stroke-opacity:0;
    end
    style X fill:#fff;
    subgraph Y[" "]
      B
      COMMENT2["Pass an image and<br>its classification result"]
      style COMMENT2 fill-opacity:0, stroke-opacity:0;
    end
    style Y fill:#fff;
    subgraph Z[" "]
      C
      COMMENT3["Display an image and<br>its classification result<br>・ TakePhoto<br>・ Live Monitoring"]
      style COMMENT3 fill-opacity:0, stroke-opacity:0;
    end
    style Z fill:#fff;
    subgraph W[" "]
      D
      COMMENT4["Receive TakePhoto command<br>and respond its result"]
      style COMMENT4 fill-opacity:0, stroke-opacity:0;
    end
    style W fill:#fff;
    subgraph Application
      W
      X
      Y
      Z
    end
#!/usr/bin/python3
import argparse
from PIL import Image, ImageDraw, ImageFont
import actfw_core
from actfw_core.task import Pipe, Consumer
from actfw_core.system import find_csi_camera_device
from actfw_core.unicam_isp_capture import UnicamIspCapture
import actfw_raspberrypi
from actfw_raspberrypi.vc4 import Display
import numpy as np
from model import Model

(CAPTURE_WIDTH, CAPTURE_HEIGHT) = (224, 224)  # capture image size
(DISPLAY_WIDTH, DISPLAY_HEIGHT) = (640, 480)  # display area size


class Classifier(Pipe):

    def __init__(self, capture_size):
        super(Classifier, self).__init__()
        self.model = Model()
        self.capture_size = capture_size

    def proc(self, frame):
        rgb_image = Image.frombuffer('RGB', self.capture_size, frame.getvalue(), 'raw', 'RGB')
        rgb_image = rgb_image.resize((CAPTURE_WIDTH, CAPTURE_HEIGHT))
        input_image = np.asarray(rgb_image).reshape(1, CAPTURE_WIDTH, CAPTURE_HEIGHT, 3).astype(np.float32)
        probs, = self.model.MobileNet_v2(input_image)
        return (rgb_image, probs[0][1:])


class Presenter(Consumer):

    def __init__(self, settings, preview_window, cmd):
        super(Presenter, self).__init__()
        self.settings = settings
        self.preview_window = preview_window
        self.cmd = cmd
        self.font = ImageFont.truetype(font='/usr/share/fonts/truetype/dejavu/DejaVuSansMono-Bold.ttf', size=18)
        with open('labels.txt') as f:
            self.labels = f.read().splitlines()

    def proc(self, images):
        rgb_image, probs = images
        top1 = probs.argsort()[-1]
        if probs[top1] > self.settings['threshold']:
            actfw_core.notify([{'prob': float(probs[top1]), 'label': self.labels[top1]}])
        self.cmd.update_image(rgb_image)  # update `Take Photo` image
        actfw_core.heartbeat()
        if self.preview_window is not None:
            draw = ImageDraw.Draw(rgb_image)
            draw.text((0, 0), "{:>6.2f}% {}".format(100 * probs[top1], self.labels[top1]), font=self.font, fill=(0, 255, 0))
            self.preview_window.blit(rgb_image.tobytes())
            self.preview_window.update()


def main(args):

    # Actcast application
    app = actfw_core.Application()

    # Load act setting
    settings = app.get_settings({'display': True, 'threshold': 0.8})

    # CommandServer (for `Take Photo` command)
    cmd = actfw_core.CommandServer()
    app.register_task(cmd)

    # Capture task
    capture_size = (CAPTURE_WIDTH, CAPTURE_HEIGHT)
    framerate = 15
    device = find_csi_camera_device()
    cap = UnicamIspCapture(unicam=device, size=capture_size, framerate=framerate)
    app.register_task(cap)

    # Classifier task
    conv = Classifier(capture_size)
    app.register_task(conv)

    def run(preview_window=None):

        # Presentation task
        pres = Presenter(settings, preview_window, cmd)
        app.register_task(pres)

        # Make task connection
        cap.connect(conv)  # from `cap` to `conv`
        conv.connect(pres)  # from `conv` to `pres`

        # Start application
        app.run()

    if settings['display']:
        with Display() as display:
            display_width, display_height = display.size()
            scale = min(float(display_width / CAPTURE_WIDTH), float(display_height / CAPTURE_WIDTH))
            width = int(scale * CAPTURE_WIDTH)
            height = int(scale * CAPTURE_HEIGHT)
            left = (display_width - width) // 2
            upper = (display_height - height) // 2
            with display.open_window((left, upper, width, height), (CAPTURE_WIDTH, CAPTURE_HEIGHT), 16) as preview_window:
                run(preview_window)
    else:
        run()


if __name__ == '__main__':
    parser = argparse.ArgumentParser(description='example: 1000 class classification')
    main(parser.parse_args())
Implement Classifier
A 1000-class classifier Classifier is implemented by inheriting Pipe.
class Classifier(Pipe):

    def __init__(self, capture_size):
        super(Classifier, self).__init__()
        self.model = Model()
        self.capture_size = capture_size

    def proc(self, frame):
        rgb_image = Image.frombuffer('RGB', self.capture_size, frame.getvalue(), 'raw', 'RGB')
        rgb_image = rgb_image.resize((CAPTURE_WIDTH, CAPTURE_HEIGHT))
        input_image = np.asarray(rgb_image).reshape(1, CAPTURE_WIDTH, CAPTURE_HEIGHT, 3).astype(np.float32)
        probs, = self.model.MobileNet_v2(input_image)
        return (rgb_image, probs[0][1:])
In the Classifier class, the input array is transformed to fit in the type and shape of the argument of the Model.Mobilenet_v2 method, then the classifier is called. actfw_core.unicam_isp_capture.UnicamIspCapture processes the following matching interface to insert the actfw_core.Frame object into the queue.
- Get a byte array of an RGB image by
getvalue(). - Create an
Imageobject byPIL.image.frombufferfor easy processing - Convert and reshape to a numpy float array to fit the MobileNet_v2 input
Implement Presenter
In addition to displaying a screen, Presenter performs the following:
- Update of an image of
CommandServer; set up an object ofCommandServerduring its initialization, and call itsupdate_imageinproc - Liveness monitoring: call
actfw_core.heartbeat()inproc
actfw_core.notify specifies the content of the Act Log sent to Actcast. In our case, it sends a classification result and its label following the format specified in data_schema.json.
class Presenter(Consumer):

    def __init__(self, settings, preview_window, cmd):
        super(Presenter, self).__init__()
        self.settings = settings
        self.preview_window = preview_window
        self.cmd = cmd
        self.font = ImageFont.truetype(font='/usr/share/fonts/truetype/dejavu/DejaVuSansMono-Bold.ttf', size=18)
        with open('labels.txt') as f:
            self.labels = f.read().splitlines()

    def proc(self, images):
        rgb_image, probs = images
        top1 = probs.argsort()[-1]
        if probs[top1] > self.settings['threshold']:
            actfw_core.notify([{'prob': float(probs[top1]), 'label': self.labels[top1]}])
        self.cmd.update_image(rgb_image)  # update `Take Photo` image
        actfw_core.heartbeat()
        if self.preview_window is not None:
            draw = ImageDraw.Draw(rgb_image)
            draw.text((0, 0), "{:>6.2f}% {}".format(100 * probs[top1], self.labels[top1]), font=self.font, fill=(0, 255, 0))
            self.preview_window.blit(rgb_image.tobytes())
            self.preview_window.update()
main
See the application figure for details about the entry point.
def main(args):

    # Actcast application
    app = actfw_core.Application()

    # Load act setting
    settings = app.get_settings({'display': True, 'threshold': 0.8})

    # CommandServer (for `Take Photo` command)
    cmd = actfw_core.CommandServer()
    app.register_task(cmd)

    # Capture task
    capture_size = (CAPTURE_WIDTH, CAPTURE_HEIGHT)
    framerate = 15
    device = find_csi_camera_device()
    cap = UnicamIspCapture(unicam=device, size=capture_size, framerate=framerate)
    app.register_task(cap)

    # Classifier task
    conv = Classifier(capture_size)
    app.register_task(conv)

    def run(preview_window=None):

        # Presentation task
        pres = Presenter(settings, preview_window, cmd)
        app.register_task(pres)

        # Make task connection
        cap.connect(conv)  # from `cap` to `conv`
        conv.connect(pres)  # from `conv` to `pres`

        # Start application
        app.run()

    if settings['display']:
        with Display() as display:
            display_width, display_height = display.size()
            scale = min(float(display_width / CAPTURE_WIDTH), float(display_height / CAPTURE_WIDTH))
            width = int(scale * CAPTURE_WIDTH)
            height = int(scale * CAPTURE_HEIGHT)
            left = (display_width - width) // 2
            upper = (display_height - height) // 2
            with display.open_window((left, upper, width, height), (CAPTURE_WIDTH, CAPTURE_HEIGHT), 16) as preview_window:
                run(preview_window)
    else:
        run()


if __name__ == '__main__':
    parser = argparse.ArgumentParser(description='example: 1000 class classification')
    main(parser.parse_args())
Labels
Save this as app/labels.txt .
Each line in this file represents a synset label.
tench, Tinca tinca
goldfish, Carassius auratus
great white shark, white shark, man-eater, man-eating shark, Carcharodon carcharias
tiger shark, Galeocerdo cuvieri
hammerhead, hammerhead shark
electric ray, crampfish, numbfish, torpedo
.
.
.
Dependencies
Define package dependencies to .actdk/dependencies.json.
Note that the key raspberrypi-bullseye is specified.
{
  "apt": [
    "libv4l-0",
    "libv4lconvert0",
    "python3-pil",
    "python3-numpy",
    "fonts-dejavu-core"
  ],
  "pip": [],
  "raspberrypi": {
    "apt": [
      "libraspberrypi0"
    ],
    "pip": [
      "actfw-raspberrypi"
    ]
  }
}
healthchecker
Create app/healthchecker.
Please refer to Implement an Actcast application for implementation.
Build Actcast application
The following command builds the Actcast application.
(For development)
$ actdk build <IDENTIFIER_YOU_LIKE>(For release)
$ actdk build --releaseTesting
After building the Actcast application described above, the following command transfers the application built for release to your Raspberry Pi.
$ actdk deploy <IDENTIFIER_YOU_LIKE>After finishing the transfer of your application built either for release or testing, the following command triggers the application execution.
(For development)
$ actdk run <IDENTIFIER_YOU_LIKE> -a(For release)
$ actdk run <IDENTIFIER_YOU_LIKE> -a --releaseOn running that command, prepare settings for the app. Write settings in act_settings.json file in current directory. This file is to be passed to the App.
The following JSON file is an example of act_settings.json. It enables the display and sets the threshold to 0.7.
{
  "display": true,
  "threshold": 0.7
}
You can generate act_settings.json with actdk generate act-settings.
act_settings.json must follow the JSON schema file setting_schema.json. The validation for act_settings.json against setting_schema.json is run on actdk run. Also, the following command validates act_settings.json and the other schema files.
$ actdk validate-jsonYour Raspberry Pi must be correctly connected to an USB camera or RraspberryPi camera module as this application uses a camera.
If you specify the -a option, the command redirects the output to stdout to your working computer. If you omit -a, the execution of the command exits immediately without regard to the Actcast application’s status.
The following command stops the execution of your application running on your Raspberry Pi.
$ actdk stop <IDENTIFIER_YOU_LIKE>If you specified -a with actdk run, interruption by C-c stops the execution automatically.
Testing after online build on Actcast
Once you have tested the local-built application on your Raspberry Pi, you should try the online-built one. See Upload to Actcast for details.
Actcast rebuilds an uploaded image and replaces the libmodel.so with an efficient version.
If the online build succeeds, you can install and run the application as an Act on your Raspberry Pi from Web UI.
For this purpose, use a micro SD card with an image of the ordinary Actcast client for the Raspberry Pi. Note that the image is different from the one you previously used for the offline testing phase.